Your kitchen is more than just a place to cook meals—it's the heart of your home. From family gatherings to late-night snacks, the kitchen is where memories are made. So, when it comes to renovating, it only makes sense to start there. However, kitchen remodels can quickly get expensive, especially if you’re eyeing custom cabinetry.
The good news? You don’t need to empty your savings to get beautiful, functional cabinets. With a DIY custom cabinet consultation, you can create the kitchen of your dreams, without breaking the bank.
In this guide, we’ll walk you through how to design and install custom cabinets yourself, while ensuring you don’t compromise on style or quality.
Why Custom Kitchen Cabinets Are Worth the Investment
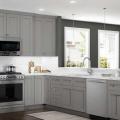
If you've been scrolling through Pinterest or Instagram, you've probably come across kitchens with stunning custom cabinetry. Unlike generic stock cabinets, custom cabinets are designed to fit your unique space and lifestyle. They allow you to incorporate extra-deep drawers, built-in shelving, and finishes that reflect your personal style.
Here’s why custom cabinets are worth it:
- Tailored Design: Get the perfect fit for your kitchen layout.
- Maximized Storage: Say goodbye to clutter with cabinets designed around your daily needs.
- Enhanced Aesthetics: Custom cabinets elevate the look and feel of your kitchen, whether you prefer modern minimalism or rustic charm.
- Increased Home Value: Custom cabinetry is an investment that can boost your home’s resale value.
Interested in exploring more styles and materials for your kitchen? Check out this comprehensive guide to kitchen cabinets.
Step 1: Assess Your Kitchen’s Needs
Before jumping into the design phase, take a moment to think about how you actually use your kitchen. Consider the following:
- Space Constraints: Are you running out of storage? Do you need more counter space?
- Cooking Habits: Do you bake frequently or need extra room for gadgets?
- Aesthetic Preferences: What kind of design do you envision? Modern, rustic, farmhouse, or something else?
Take accurate measurements of your space, noting the size of walls, ceilings, and any existing cabinetry. The better your prep work, the easier it will be when you work with a cabinet consultant.
Step 2: Schedule a DIY Custom Cabinet Consultation
While you could dive into YouTube tutorials, hiring a professional for a DIY custom cabinet consultation is a much smoother route. Think of it as having a personal coach guiding you through the design and installation process, but without the hefty price tag of a full-service contractor.
Here's what you'll get from a consultation:
- Personalized Cabinet Layout: A design tailored to your kitchen’s dimensions.
- Expert Guidance: Advice on materials, colors, and styles that fit your budget.
- Step-by-Step Instructions: Clear instructions for building and installing your cabinets.
- Ongoing Support: Assistance if you run into any issues during the process.
Want to learn more? You can schedule your DIY consultation here.
Step 3: Choose the Right Materials and Cabinet Styles
Now comes the fun part—selecting materials and finishes. You want your cabinets to not only look great but also stand up to the wear and tear of daily use.
Popular Cabinet Materials:
- Solid Wood: Durable, timeless, and beautiful—perfect for a traditional look.
- MDF: Smooth and cost-effective, ideal for painted finishes.
- Plywood: Strong yet lightweight, great for cabinet boxes.
- Laminate: Affordable and available in a variety of colors and textures.
Top Cabinet Styles:
- Shaker: Simple and elegant with clean lines.
- Flat-panel: Sleek, modern, and minimalist.
- Inset: Classic and refined.
- Glass-front: Ideal for showcasing your best dishware.
When choosing materials and finishes, consider both style and durability, especially since your kitchen is likely to see heavy use.
Step 4: Set a Budget and Timeline
One of the biggest advantages of a DIY custom cabinet project is the ability to control your budget. Break down the costs by considering:
- Materials: Wood, finishes, hardware.
- Tools: Drill, screws, clamps, levels, etc.
- Hardware: Hinges, pulls, and knobs.
- Professional Help: If you need assistance with specialized tasks, like electrical or lighting.
Once you’ve figured out your budget, set a realistic timeline. Depending on the complexity, your project could take anywhere from a few weekends to a couple of months. Be patient—the end result will be worth it.
Step 5: Prepare for Installation
Once your custom cabinets are ready to go, it's time to prepare for installation. Here’s a quick checklist:
- Clear Out Old Cabinets: Make space by removing any existing cabinetry.
- Gather Tools: Make sure you have everything you need for the job.
- Follow Instructions: Carefully follow the assembly instructions provided by your consultant.
- Consult for Help: If you run into any roadblocks, reach out to your consultant for support.
Your goal? A professional finish that looks like it was done by a pro—because, in many ways, it was!
Step 6: Add Finishing Touches
After the installation, it’s the little details that will make all the difference. Consider these finishing touches to elevate your new cabinets:
- Hardware: Choose stylish knobs, pulls, or handles that complement your design.
- Soft-Close Hinges: For a more luxurious, smooth feel.
- Under-Cabinet Lighting: A great way to highlight your countertops.
- Trim and Molding: For a polished, custom look.
These small elements can turn your DIY cabinets into something that looks like it was designed by an interior designer.
Final Thoughts: Your Dream Kitchen Is Within Reach
Designing and installing custom kitchen cabinets may seem daunting, but with careful planning and the right support, it’s entirely possible to create a high-end, functional space on your own. By combining DIY effort with professional consultation, you can transform your kitchen into the heart of your home without blowing your budget.
Ready to get started? Check out this DIY Custom Cabinet Consultation guide and start turning your dream kitchen into a reality today.

-
 FMD CabinetsFounder
